
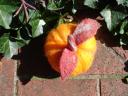

This is my felted pumpkin. I took a hunk of loose wool batting and then three shades of orange and a couple of shades of brown roving’s. First, I started rolling the batting into itself to form a ball. With another hunk I wrapped in the other direction. Next, with all the oranges and a little brown roving I pulled them into an inch or so wide strips. Finding what I considered to be the centers of my ball, top and bottom and using a felting needle I punched the end of the strip into the bottom center and then wrapped it completely around the ball to the top, repeating the needle felting and back to the bottom. I blended the colors as I moved around the now magical pumpkin. Once all the all the ends were fixed I began to needle felt the entire pumpkin smoothing as I went. At one point I thought of wet felting and decided “NOT” As I worked, more ideas took shape on how to form and make this an awesome pumpkin. I used a heavier needle and began felting in the edges to make it look realistic. Constantly shaping the pumpkin with my hands as I went along and here is a perfect pumpkin.
Now it was onto the stem and leaves. I took brown, burnt orange, orange and grey-brown and layered strips of colors together and then wet felt the stem. For the stem I used soap and warm water and rolled the roving between my palms. At one point I doubled it because it got to thin. I raised it in cold water and rolled it in a towel. Not waiting for it to dry I needled it into the top of the pumpkin and shaped it. The leaves are needle felted with crisscrossed roving in several of the above colors. Once I needle felted them enough to make a good piece of fabric I cut out the leaves and needled the ends of the leaves into the top of this cute pumpkin. That’s all folks! LOL


